

The idea behind Workload planner is to get a clear picture of the current jobs and to get help with decisions about incoming offers. Initially, this feature was developed for individual translators, who know their average day capacity. However, it could be useful for companies as well, regardless how many translators you have and which capacity you can provide, because this tool presents ongoing jobs in a clear and readable chart, giving you another representation of your work.
To turn the planner on, please open application Settings, switch to the Productivity settings, and mark Turn on workload planner check-box. In the same settings group, specify your daily capacity and preferred job allocation method (Earliest delivery, Latest delivery or Evenly).
After that, when any new job will be created or any old job will be re-saved, the program will try to allocate it through days from the job day until job deadline using specified allocation method. Weekend days will be left free (if not specified otherwise).
To see how allocation was done, switch to the Workload planner tab in the job editing window. It contains very simple table with information about planned working days and volume assigned for each day.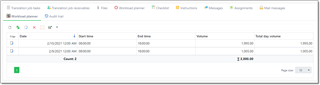
You can make any corrections in this table to adjust automatic results. In this case, mark Manual allocation check-box to prevent overriding your changes when the job will be saved.
Above the table you can see weighted volume of the job being edited. This value is calculated from the job tasks table by applying adjustment factors of each used unit. When making manual changes in this table, it is recommended to control equity of table amount and weighted volume.
To open main Workload planner, select Scheduler and planning section in the navigation tree and then select Workload planner item.
Example of the Workload planner window: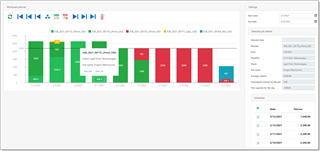
When the planner is opened, a default time period will be preselected (see Planner parameters in the top right corner). Usually it includes few previous days from today and nearest two weeks. Also, parameters group contain Show labels on the chart checkbox, which allows to turn labels off and on. The chart contains a lot of jobs and a lot of labels, correspondingly. Turning labels off allows to make the picture clearer, while you still can get additional details by hovering mouse arrow over necessary job.
Main pane consists of a bar chart, where X axis contains days, and Y axis represents volumes. Each day may include any number of jobs (colorized rectangles). Top red line represents maximum day capacity. Of course, our goal is to avoid exceeding this line and appearing of jobs on weekends.
Hover mouse pointer on any bar to see detailed information about the job, which includes job volume and deadline. Double click on a job to get full information about it in the Selected job details panel. In this panel, the following information is displayed: job number, date, deadline, client and volume. Below them, two additional numbers are displayed (unassigned volume of the selected job and remained capacity for the selected day), followed by the job allocation table, which is similar to that in the job editing form. You can make any manual adjustments in this table, and they will be immediately saved in the database. When any manual change is made here, Manual allocation check-box will be set automatically for the job being edited.
If you make any external changes (add or edit any job from the dashboard or job list), click refresh browser page by pressing F5.
When any job is selected (hover mouse pointer over a job and click View data), you can use the buttons on the toolbar to reallocate a selected job.
For example, you had a job to translate 4000 words, which lasts from 10th to 12th day of a month, which means that you have 3 days to complete it. If Earliest delivery method is used and day capacity is 2500 words, than the program will place 2500 words to 10th day and 1500 words to 11th day. Say, a new urgent job arrives (700 words), which must be started and delivered on 10th day. After adding this job, planned volume for the 10th day will become 3200 words (2500 + 700):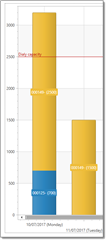
But we can easily see that the first job can be re-allocated and shifted to later days. Simply select it and click Try move to earliest delivery (no weekends) on the ribbon. Since we have free slots in the next days, this job can be re-allocated.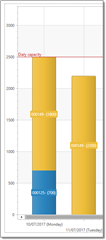
As 12th day is still free, you can easily see that on 11th and 12th days you can translate about 2800 new words without exceeding default daily capacity.
When Try move to the specified period is clicked, you will be able to manually set time period when plan to work on the selected job. If possible, the program will place this job explicitly to these days.
You may add exceptions, which will be taken into account when the system will automatically allocate jobs. To do this, select Manage exception days in the Workload planner view. You will see simple list containing two columns: Day and Volume. If you are fully unavailable on certain day, add it and set volume to zero. If you are partially unavailable, enter average value which you can process on that day.