RWS Community
RWS Community
  • Site

Trados Studio

Trados Team

Trados Accelerate

Trados Enterprise

Trados GroupShare

Trados Business Manager

Passolo

MultiTerm

RWS AppStore

Connectors

Beta Groups

Managed Translation

MultiTrans

TMS

Trados Enterprise

WorldServer

Language Weaver

Language Weaver Edge

Language Weaver Connectors

Language Weaver in Trados Studio


Tridion Docs

Tridion Sites

Contenta

LiveContent

XPP

Trados Studio Ideas

Trados GroupShare Ideas

Trados Team Ideas

Trados Team Terminology Ideas

Trados Enterprise & Accelerate Ideas

Trados Business Manager Ideas

MultiTerm Ideas

Passolo Ideas

RWS Appstore Ideas

Tridion Docs Ideas

Tridion Sites Ideas

Language Weaver Ideas

Language Weaver Edge Ideas

Managed Translation - Enterprise Ideas

TMS Ideas

WorldServer Ideas

Trados Enterprise Ideas

XPP Ideas

GroupShare Developers

Language Cloud Developers

MultiTerm Developers

Passolo Developers

Trados Studio Developers

Managed Translation Developers

TMS Developers

WorldServer Developers

Tridion Docs Developers

XPP Developers

Language Combinations by Language Services

RWS Training & Certification

Style Guides

RWS Campus

Trados Approved Trainers

ETUG (European Trados User Group) Public Information

Nordic Tridion Docs User Group

Tridion West Coast User Group

Community Ops

demospace

RWS Community Internal Group

AURORA

Internal Trados Ideas

Linguistic Validation

Mercury

XPP Cloud

Recognition & Reward System

RWS Community Platform Related Questions

Community Solutions Hub (Trados)

Events

RWS Training & Certification

To RWS Support

  • Search
  • Translate

    Detecting language please wait for.......


    Powered by
  • User
  • Site
  • Search
  • User
  • Products
  • Trados Portfolio
  • Trados Business Manager
  • More
  • Cancel
Trados Business Manager
  • Products
  • Trados Portfolio
  • Trados Business Manager
  • More
  • Cancel

Trados Business Manager > Wiki

Multitenancy
  • Home
  • Blog and Product Updates
  • Forums
  • Wiki
  • Ideas
  • Docs
  • More
  • Cancel
  • New
Show Translation Options

Detecting language please wait for.......


Powered by
Trados Business Manager requires membership for participation - click to join
  • Wiki
  • +Licensing & Installation
  • -TBM 6
    • +Release Notes
    • +Basic Information
    • Quick Start
    • +Database engine
    • +Software configuration
    • +List views and data entry forms: usage and customization
    • Dashboards
    • +Reference data
    • +Documents
    • +Security system
    • -Service functions
      • +Importing analysis data from CAT tools
      • +Mail sender
      • File manager
      • +Notifications
      • Audit trail
      • Custom fields
      • Favorites
      • Custom logos
      • Multitenancy
      • Scheduler
      • Workload planner
      • Vendor busyness planner
      • Database structure
      • Document custom marks
      • Replacing references and deleting duplicates
    • +Data export and import
    • +Reports and analytics
    • +Invoice templates and custom reports
    • API
    • +Portal for customers
    • +Portal for Vendors
    • +Integrations in Business Manager
    • +CV
  • +Trados Business Manager Connector plugin
  • +Trados Business Manager plugin
  • +FAQ
  • TBM 5 documentation
  • Download links for older versions

Multitenancy

Tenant creation

Trados Business Manager allows to create multiple databases and use same application instance to work with different entities (companies).

List of tenants (entities) can be controlled only by application administrator (or server administrator) and only if you have Enterprise edition.

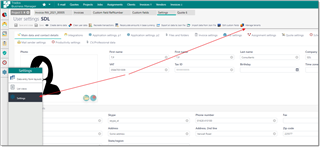
To manage tenants, you have to login into a default tenant of the system as administrator. After login, open application settings and then click Manage tenants button on the toolbar:

You will see a popup dialog with list of tenants:

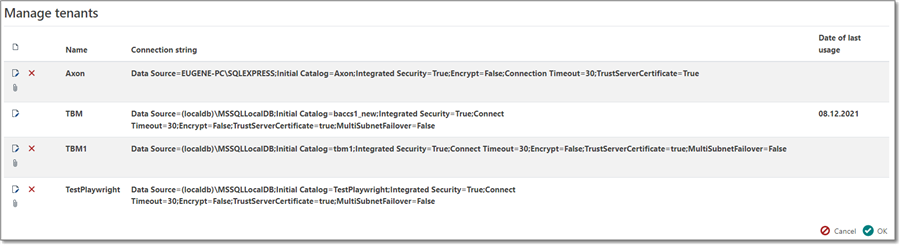
As you see from the screenshot, each tenant has a name (important) and connection string to a database. Again, as you can see from this example, here we have 4 tenants (databases) in MS SQL Server LocalDB instance and one tenant at SQL Server Express instance. This means that you combine database engines (for example, mix MS MSQL and PostgreSQL databases).

To add a new tenant, click New button. Or, to edit an existing instance, click Edit button. The following form will be opened:

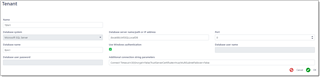
On this screen, you have to specify tenant Name, select one of supported database engines and provide connection details, like server name (or address), connection port, database name and credentials. In the last field (Additional connection string parameters) please any additional parameters which you need (information about connection string for different database engines can be found in a corresponding documentation of a database engine or using search engines). Some default additional parameters will be added automatically by TBM when you select a database engine. However, you're free to edit default value as per your needs.

Date of last usage column shows date of last login into a tenant.

When you're done, click OK to confirm tenant creation.

Now you can test a new tenant. You can use another browser for this, or logout from the system in a current browser. In the logon window, please focus address bar:

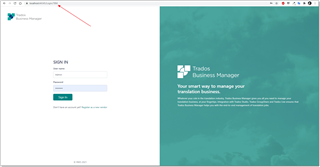
You can find tenant name following after Login part of the URL address. Instead of default tenant, type your tenant name and press Enter. Same login screen appears, but now you can use only users which belong to this tenant.

Important! Please remember each database (tenant) has its own set of users, and you have to use correct user names and password which exists in a tenant where you're logging in.

By default, Admin password for a newly created tenant is User@TBM. Try to enter this credentials and click Log In. If database connection string is configured correctly, you will see empty dashboard, and can start using new database.

Important! After database creation, please return to the tenant list and click File icon, where you specify a folder to store files for a created tenant. It is important to change default location, because using same base folder for multiple tenants may lead to undesired results: different tenants may get access to each other's files.
Note. If you have multiple tenants in your application and provide access to different external and internal users, they may open main application page (for example, www.mytbm.com) and see default login page (for the TBM tenant). So, when sending login details to users, please emphasize that they have to use correct login page (for example, www.mytbm.com/Login/Tenant1). It's better to add this link to bookmarks to avoid mistakes in future.
Note. In previous version of TBM, there was a tenant selector on the login page. However, sometimes it's not desirable to allow everyone to view list of available tenants. For security reasons, tenant selection is available only via URL address, so user should know tenant name in advance to perform successful login.

Tenant deletion

On the tenant list screen, you can delete a tenant from the configuration. However, when you do this, physical database on hard drive won't be deleted. You have to delete it manually using database management tools provided by a database engine.

The same applies to tenant editing. If you change database name in a connection string, database itself won't be renamed in a database engine. If you try to login into a tenant with changed database name, you will see newly created empty database. To avoid this, you can manually rename database using database management tools before trying to login into edited database.

  • Share
  • History
  • More
  • Cancel
Related
Recommended
  • Our Terms of Use
  • Copyright
  • Privacy
  • Security
  • Anti-slavery Statement
  • Cookie Notice
  • YouTube