

Web-version of Trados Business Manager is an ASP .NET Core application, which can be installed on a server running under Windows Server operation system with Internet Information Services installed. Although configuration and installation of operating system and environment can't be covered by this article, it will provide some basic information about system components and application itself. For secure environments, configuration will require more work of qualified system administrator.
Requirements
To install and run Business Manager in on-premise mode, you need:
- Windows Server operating system (or Windows 10 with IIS)
- Internet Information Services feature
- Database engine (Microsoft SQL Server will be used as an example in this article)
- SDL Trados Business Manager Team Online installer
Video tutorial
Here you can find detailed video about installing TBM Team and Essential
https://www.youtube.com/watch?v=hS1_J_0vVhA
Installing Internet Information Services
After clean installation of Windows Server, it is required to install Internet Information Services for installation of Business Manager Online. To install IIS, follow these steps:
- In the Server Manager window, select Manage > Add roles and features.
- On the Server Roles step of the wizard, select Web Server (IIS) feature. Click Next.
- On the Web Server Role (IIS) > Role services page, make following selections:
- Web server > Common HTTP features > HTTP Redirection
- Web server > Performance > Dynamic Content Compression
- Web server > Security > Basic Authentication
- Web server > Security > URL authorization
- Web server > Security > Windows Authentication
- Web server > Application development > ISAPI Extensions
- Web server > Application development > ISAPI Filters
- Web server > Application development > WebSocket Protocol
- Management tools > Management service (not mandatory)
- Click Next > Install to finish installation.
Installing Microsoft SQL Server
Basic information about installing Microsoft SQL Server engine can be found in this article. However, on step 7, instead of Mixed authentication mode, you may leave Windows Authentication mode. In this case, you need details of a Windows user who has access to a database server.
Installing and configuring SDL Trados Business Manager Team Online
- Download recent build from your account (sdl_business_manager_online_version.exe).
- Install it on a server. Default installation location: C:\inetpub\SDL PLC\SDL Trados Business Manager Team Online\
-
Open IIS Manager and do the following:
- Do one of the following:
- right click on Sites and select Add website...; or
- In the list of websites, select Default web-site, which is created in IIS automatically, and click Basic settings... in the right menu;
- Specify Site name and Physical path (insert installation folder path):
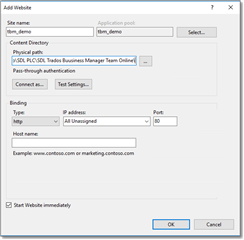
- In the Bindings group, specify domain name, if you have any. Otherwise, leave this field empty to run website under localhost. It's important to note that TBM uses automatic https redirection. This means that if you don't configure https binding here, website won't be working. There are two solutions:
- Install SSL certificate and create https binding
- Open appsettings.json file from the application installation folder and set true value for the DisableHttps parameter. Please note that this value will be replaced with the default one when you install next update for Business Manager.
- To avoid loosing DisableHttps parameter value after update, set the same parameter in the appsettings_global.json file. Initially, this file is missing, and is created only after first launch of the application. That is why it is required to set this parameter in the appsettings.json file first, and later in the appsettings_global.json file. Correct structure of the appsettings_global.json file is provided on the following screenshot:
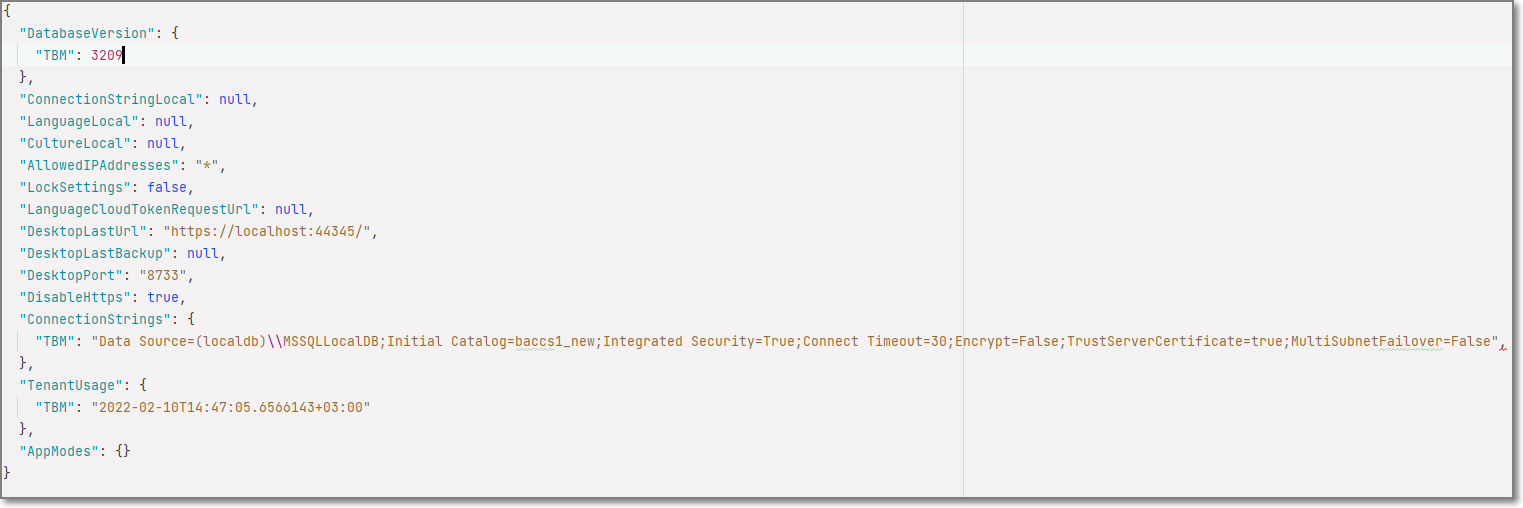
If you're advanced user, you can create this file manually, and configure DisableHttps and ConnectionStrings parameters in the text editor.
- Click OK to finish creating website.
- In the Features View of a created website, double click Authentication, right click on Anonymous Authentication, select Edit and then select Application pool identity in the opened dialog:
- Switch to the Application pools view, right click your application pool and select Advanced settings....
- In the .NET CLR Version parameter, select No Managed Code.
- Optionally, you can provide some additional settings to make application constantly available (prevent idling):
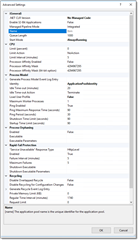
IMPORTANTIf Microsoft SQL Server uses Windows authentication, on this step you also have to check Identity parameter. By default, its value is ApplicationPoolIdentity. However, you may need to specify another user here, who has access to SQL server engine with DBCREATOR rights.
- After saving changes, website will be automatically restarted. You may select it in the list of sites and click Browse localhost on *:80 (http) item in the right panel (in case you didn't specify bindings on the step c).
- Do one of the following:
-
From Start menu (or from Licensor folder, Licensor.exe file, which can be found inside application installation folder), run licensing utility. After launch, you will see default licensing dialog, where you can activate and deactivate license, use alternative licensing options, etc.
To check license status after launching the application, hover mouse pointer over icon in the top bottom corner. To refresh license status (for example, if it shows Unlicensed, but you have installed the license), just click on this icon and wait 1-3 seconds to update information in the tooltip.
 -
Configure database connection settings. By default, application is configured to connect to a database named TBM at SQL Server instance named localhost\SQLExpress. In majority of cases, this will not satisfy your needs. To change default settings, please open your browser on a server and enter the following (or replace localhost with a valid URL for your server):
https://localhost/ConfigYou will see the following page:
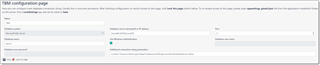
Here you can specify database connection parameters. Depending on installed engine and authentication mode, provide database server location, database name (it will be created automatically upon first launch of the application or login), and, optionally, user name and password to access database engine.
Click Save to save database connection settings. Take a note that, due to security reasons, access to this page can be locked by modifying settings file. You can see description of the process at the tp of this page. After saving changes, please go to the login page and try to logon using default credentials: Admin as user name and User@TBM as password (case-sensitive!).