RWS Community
RWS Community
  • Site

Trados Studio

Trados Team

Trados Accelerate

Trados Enterprise

Trados GroupShare

Trados Business Manager

Passolo

MultiTerm

RWS AppStore

Connectors

Beta Groups

Managed Translation

MultiTrans

TMS

Trados Enterprise

WorldServer

Language Weaver

Language Weaver Edge

Language Weaver Connectors

Language Weaver in Trados Studio


Tridion Docs

Tridion Sites

Contenta

LiveContent

XPP

Trados Studio Ideas

Trados GroupShare Ideas

Trados Team Ideas

Trados Team Terminology Ideas

Trados Enterprise & Accelerate Ideas

Trados Business Manager Ideas

MultiTerm Ideas

Passolo Ideas

RWS Appstore Ideas

Tridion Docs Ideas

Tridion Sites Ideas

Language Weaver Ideas

Language Weaver Edge Ideas

Managed Translation - Enterprise Ideas

TMS Ideas

WorldServer Ideas

Trados Enterprise Ideas

XPP Ideas

GroupShare Developers

Language Cloud Developers

MultiTerm Developers

Passolo Developers

Trados Studio Developers

Managed Translation Developers

TMS Developers

WorldServer Developers

Tridion Docs Developers

XPP Developers

Language Combinations by Language Services

RWS Training & Certification

Style Guides

RWS Campus

Trados Approved Trainers

ETUG (European Trados User Group) Public Information

Nordic Tridion Docs User Group

Tridion West Coast User Group

Community Ops

demospace

RWS Community Internal Group

AURORA

Internal Trados Ideas

Linguistic Validation

Mercury

XPP Cloud

Recognition & Reward System

RWS Community Platform Related Questions

Community Solutions Hub (Trados)

Events

RWS Training & Certification

To RWS Support

  • Search
  • Translate

    Detecting language please wait for.......


    Powered by
  • User
  • Site
  • Search
  • User
  • Products
  • Trados Portfolio
  • Trados Business Manager
  • More
  • Cancel
Trados Business Manager
  • Products
  • Trados Portfolio
  • Trados Business Manager
  • More
  • Cancel

Trados Business Manager > Wiki

Creating an account for a customer
  • Home
  • Blog and Product Updates
  • Forums
  • Wiki
  • Ideas
  • Docs
  • More
  • Cancel
  • New
Show Translation Options

Detecting language please wait for.......


Powered by
Trados Business Manager requires membership for participation - click to join
  • Wiki
  • +Licensing & Installation
  • -TBM 6
    • +Release Notes
    • +Basic Information
    • Quick Start
    • +Database engine
    • +Software configuration
    • +List views and data entry forms: usage and customization
    • Dashboards
    • +Reference data
    • +Documents
    • +Security system
    • +Service functions
    • +Data export and import
    • +Reports and analytics
    • +Invoice templates and custom reports
    • API
    • -Portal for customers
      • Creating an account for a customer
      • Portal usage and dashboard
      • Editing personal information
      • Working with quotes
      • Working with translation jobs
      • Working with translation projects
      • Working with invoices and payments
      • Viewing reports
      • Client self-registration
    • +Portal for Vendors
    • +Integrations in Business Manager
    • +CV
  • +Trados Business Manager Connector plugin
  • +Trados Business Manager plugin
  • +FAQ
  • TBM 5 documentation
  • Download links for older versions

Creating an account for a customer

Manual creation

  1. Select Security > Users in the navigation menu.
  2. Click New to create a new user.
  3. Set a name (login) for a user, and select associated customer from the list.

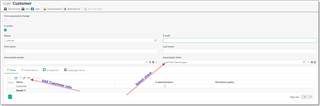
  4. Then, add a new role (Customer) to the list of roles.
  5. By default, user's password is blank. You can click Change password to set some default password and then inform a user about it.
  6. Click Save.
  7. Now user can login into a portal.

User creation in batch mode

You can also quickly create multiple logins in batch mode. This function allows to create users (logins) for selected clients and vendors, by quickly adding them to a list and then mass sending confirmation emails to created users with their initial passwords.

Prerequisites:

  • Web-app URL is specified in the application settings;
  • Necessary (and enabled) message templates for registration confirmation exist in the message templates list (separate templates for clients and vendors)

Procedure:

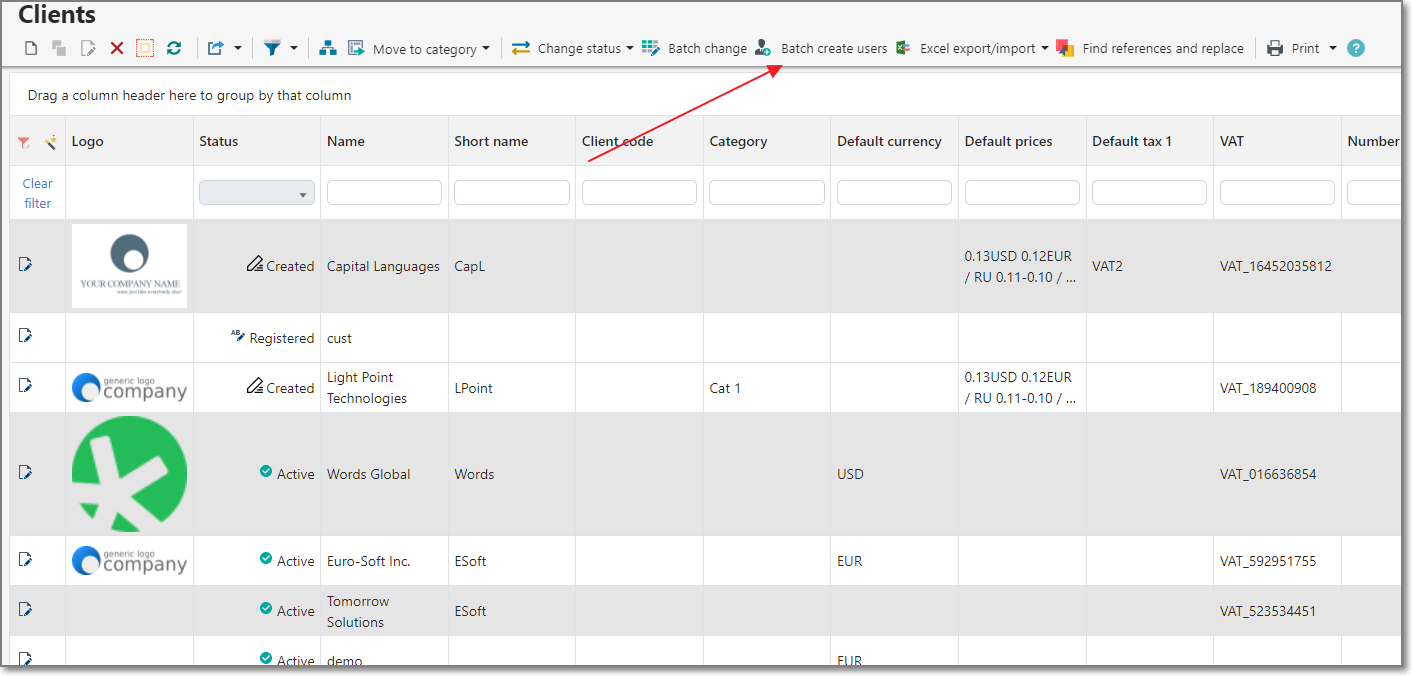
  • Open list of clients or list of vendors
  • Select necessary records for which you wish to create client/vendor portal users
  • Click Batch create users button on the toolbar:

  • User creation dialog will be opened, with some pre-filled data. For clients, application will automatically load all client contacts (where Invoicing matters box is unchecked). This means that by default for each client multiple user rows could be created, while for each vendor exactly one row will be created.
  • In this list, click Remove item button for each user which you don't want to create. A row will be deleted from the table:

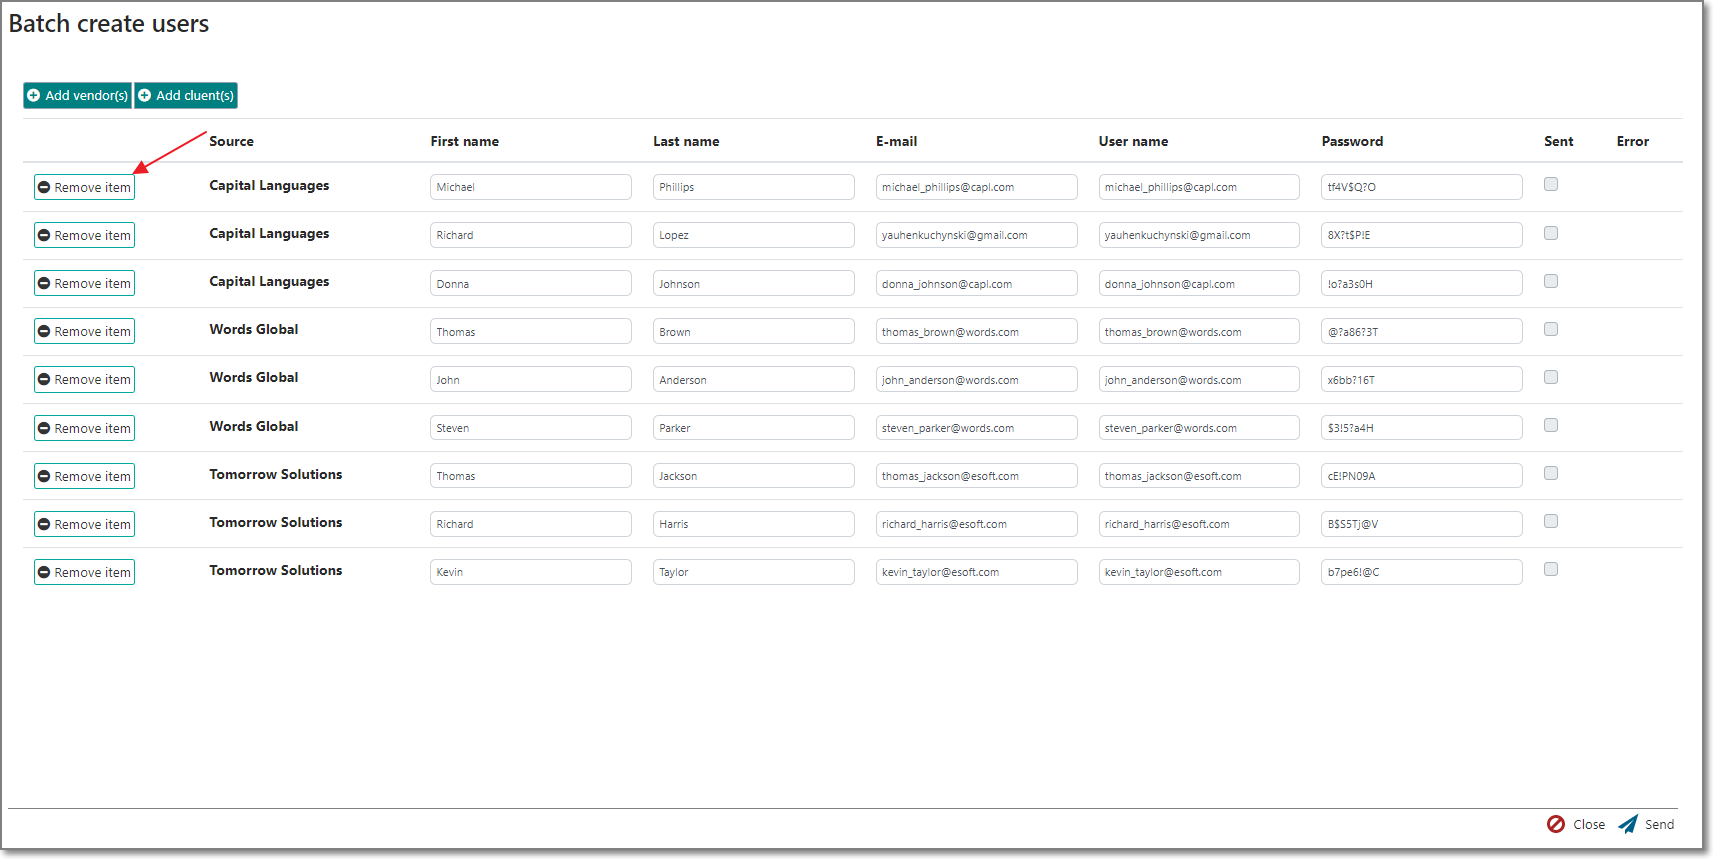
  • If needed, click Add client(s) and/or Add vendor(s) to additional users to create to the list.
  • In the table itself, make necessary corrections in the First name, Last name, Email, User name and Password columns.
  • Take a note that initially generated password is not hidden. You can change it as you wish, but after user creation it won't be possible to view it. It is visible in this dialog and not encrypted, because this value must be included in the confirmation email sent to a created user. By default, all created users will have Force password change box checked, so after first login a user will be forced to change this initially generated password.
  • When you're ready, click Send. Be careful: if you're creating too many users at once, it could take a lot of time to process the whole table. Mails are sent with interval of few seconds.
  • When operation finishes, you will see the results. Sent checkbox means that user was successfully created and confirmation message was sent. Otherwise, you will see some error text in the Error column. For example, user with provided email or user name could already exist in the database. In this case, you can make necessary corrections and click Send again - application will attempt to process only unprocessed users (users with Sent checkbox won't get a message again).

Tags:

Web
Customer Portal
  • Share
  • History
  • More
  • Cancel
Related
Recommended
  • Our Terms of Use
  • Copyright
  • Privacy
  • Security
  • Anti-slavery Statement
  • Cookie Notice
  • YouTube