RWS Community
RWS Community
  • Site

Trados Studio

Trados Team

Trados Accelerate

Trados Enterprise

Trados GroupShare

Trados Business Manager

Passolo

MultiTerm

RWS AppStore

Connectors

Beta Groups

Managed Translation

MultiTrans

TMS

Trados Enterprise

WorldServer

Language Weaver

Language Weaver Edge

Language Weaver Connectors

Language Weaver in Trados Studio


Tridion Docs

Tridion Sites

Contenta

LiveContent

XPP

Trados Studio Ideas

Trados GroupShare Ideas

Trados Team Ideas

Trados Team Terminology Ideas

Trados Enterprise & Accelerate Ideas

Trados Business Manager Ideas

MultiTerm Ideas

Passolo Ideas

RWS Appstore Ideas

Tridion Docs Ideas

Tridion Sites Ideas

Language Weaver Ideas

Language Weaver Edge Ideas

Managed Translation - Enterprise Ideas

TMS Ideas

WorldServer Ideas

Trados Enterprise Ideas

XPP Ideas

GroupShare Developers

Language Cloud Developers

MultiTerm Developers

Passolo Developers

Trados Studio Developers

Managed Translation Developers

TMS Developers

WorldServer Developers

Tridion Docs Developers

XPP Developers

Language Combinations by Language Services

RWS Training & Certification

Style Guides

RWS Campus

Trados Approved Trainers

ETUG (European Trados User Group) Public Information

Nordic Tridion Docs User Group

Tridion West Coast User Group

Community Ops

demospace

RWS Community Internal Group

AURORA

Internal Trados Ideas

Linguistic Validation

Mercury

XPP Cloud

Recognition & Reward System

RWS Community Platform Related Questions

Community Solutions Hub (Trados)

Events

RWS Training & Certification

To RWS Support

  • Search
  • Translate

    Detecting language please wait for.......


    Powered by
  • User
  • Site
  • Search
  • User
  • Products
  • Trados Portfolio
  • Trados Business Manager
  • More
  • Cancel
Trados Business Manager
  • Products
  • Trados Portfolio
  • Trados Business Manager
  • More
  • Cancel

Trados Business Manager > Wiki

Binding report elements to data
  • Home
  • Blog and Product Updates
  • Forums
  • Wiki
  • Ideas
  • Docs
  • More
  • Cancel
  • New
Show Translation Options

Detecting language please wait for.......


Powered by
Trados Business Manager requires membership for participation - click to join
  • Wiki
  • +Licensing & Installation
  • -TBM 6
    • +Release Notes
    • +Basic Information
    • Quick Start
    • +Database engine
    • +Software configuration
    • +List views and data entry forms: usage and customization
    • Dashboards
    • +Reference data
    • +Documents
    • +Security system
    • +Service functions
    • +Data export and import
    • +Reports and analytics
    • -Invoice templates and custom reports
      • -Invoice templates
        • Getting started
        • Template designer description
        • Binding report elements to data
        • Template structure
        • Formatting rules
        • Exporting and importing template layouts
        • Asian characters in PDF files
        • Adding support to edit fields in the print preview dialog
        • Protecting generated PDF files with password
      • +Task based help
    • API
    • +Portal for customers
    • +Portal for Vendors
    • +Integrations in Business Manager
    • +CV
  • +Trados Business Manager Connector plugin
  • +Trados Business Manager plugin
  • +FAQ
  • TBM 5 documentation
  • Download links for older versions

You are currently reviewing an older revision of this page.

  • History View current version

Field list and adding fields to the designer surface

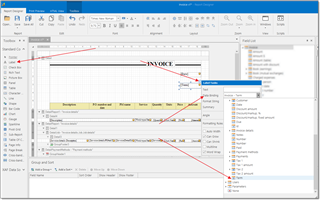
During invoice template creation the main instrument which you will use to display data in the report will be Field list.

Nested User property provides access to your personal data (your name, address and other details specified in the program settings).

Expand Invoice table and see which data it contains:

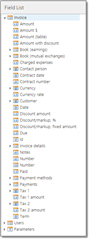
It contains a number of fields of different types. Type of field is determined by an icon. Some fields contain an arrow near icon, which means that this field contains nested fields. Nested fields may be contained in the reference fields (example is a customer, which has name, VAT code, address, etc.) or in table fields (examples areRows to print or Payment methods nested tables, which contain set of rows).

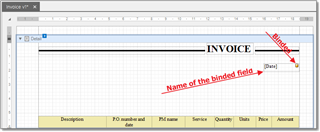
If a field is not referenced field or table field, than it can be placed on the design surface. For example, we would like to display invoice date on the surface. The easiest way to do this is to drag and drop Date field inside corresponding band. The program will automatically create label control and bind it with Date field. When any control is bound to any table field, a yellow icon is displayed in the top right corner of that element:

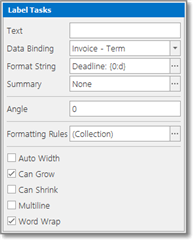
Another way to bind an element with a field is to use toolbox panel. Drag and drop Label element from the toolbox, open its helper menu and select a field to bind to:

You must clearly understand its meaning to efficiently create templates. In the built-in templates field list contains one single table called Invoice. This table provides access to all invoice fields and nested tables. All invoice rows re contained in the Invoice to print table. Selected payments methods can be found in the Payment methods table.

  1. To change binding, open helper menu again and change value in the Data binding property. Or, you can simply drag and drop any field from the Field list over existing control, and its binding will be automatically changed.

    When a control is placed on the design surface, the next very common task is to change its formatting. By default, all dates are printed using full form of date (with hours, minutes and seconds). Number usually contain too much decimal places, while you usually need to display only 2 decimals.

  2. To change formatting, open helper menu of the element and select ... button in the Format string property:

  3. In the opened window, depending on the type of formatted value, select desired options.

    For dates, your common choice will be d value. For numbers - n2 (number with thousands separator and 2 decimal places).

    Another interesting feature of format string is possibility to add prefix and postfix to the value.

  4. If to type something before or after {0:d}, than this value will be printed along with field value. Now, in addition to due date, the word 'Deadline' will be printed before it. This technique will be useful when printing customer VAT number. If customer do not have VAT number, the whole value would not be printed. But if a customer has VAT number, the following string will be printed in the invoice: "VAT: 2323232". Therefore, you will avoid situations when invoice contains "VAT: " string, but actual VAT would not be specified.
  • Our Terms of Use
  • Copyright
  • Privacy
  • Security
  • Anti-slavery Statement
  • Cookie Notice
  • YouTube