

When you select Print in the invoice list, you see composed template.
In most cases, it contains a header, followed by invoice rows, followed by summaries and additional information. Information about selected invoices (or one invoice) comes to report generation system from a database. This system processes this data and displays in the form, which is ready to be printed or saved into file. To correctly display this data, a specific template structure is required. This structure is created on the designer surface. The whole structure consist of a number of bands, which are printed in a certain order necessary amount of times.
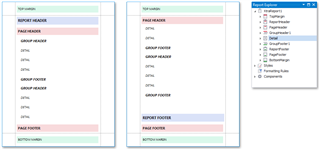
Here is how empty report looks like:
It contains the following bands:
- The Detail band, which is printed for every record in a data source (i.e., for each invoice you selected in invoice list). Every template should have the Detail band, and you cannot delete it.
- The Top Margin and Bottom Margin bands. These bands are repeated once on every document page. You also cannot delete them, but can make them invisible by decreasing height to zero.
You can also add the following bands:
|
Report header and report footer |
The Report Header is the report's first band (margins are "out-of-page" zones). The Report Footer is placed before the Page Footer and Bottom Margin on the report's last page. Usually these bands are not used in invoice/quote templates, as it makes no sense to print some header or footer for a batch of invoices. |
|
Group header and group footer |
These bands are above and below each group. The Group and Sort Panel creates these bands automatically. For example, each invoice may contain multiple jobs, and each job, in its turn, may contain multiple tasks. In this case, job can be presented as a group, and you may display some totals for each job. While designing the template or report, you're free to create groups (for example, by currency in custom reports), and use group headers and footers per current task. |
|
Detail |
Displayed once per data row. If you print multiple invoices, it will be printed once per each invoice. Thus, this is ideal band type to display invoice header. |
|
Page header and page footer |
These bands are at the top and bottom of every page in a report. They display information that should be printed on every page (for example, logo or number of pages). |
|
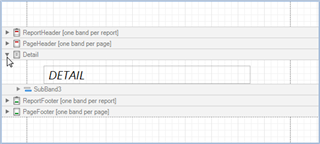
Sub-band |
Very interesting type of band. It may contain some logically separated kind of information. You can apply special rules to display or hide this band. for example, invoice may contain tax or may not contain tax. You can put tax amounts into sub-band and print it depending of the tax selection. Another example: if tax in invoice is not selected, than you may have a special sub-band where a text explaining absence of taxes will be displayed. |
|
Detail report |
Used when you need to display internal table (multiple rows). For example, after invoice header, which is printed once, a number of rows are printed. To correctly display them, you have to add Detail report inside Detail band. |
Here is graphical representation of this structure:
Expanding/collapsing bands
Adding bands
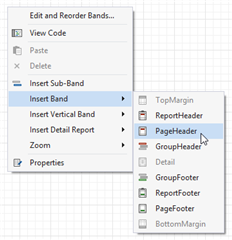
Accessing the Bands Collection
Using the Field list panel, as it was written in the previous article, you get access to template source data.
Each source represents one table from the database. Amount of rows in that table depends on the quantity of selected invoices (quotes, purchase orders, etc.) to be printed. To access application settings and user data, each table usually has User property, which provides access to this information.
Invoice structure usually contains one header, multiple rows, summary, optional information about taxes, optional notes, and a footer. Depending on the order and optionally displayed information, you select structure of the template.
For example, invoice header (Detail bans) usually contains user's and customer's data, invoice number and date, logo, etc. This band is followed by Detail report linked with 'Rows to print' table, which contains invoice rows.
As you already know, some kind of bands are displayed only once, while others are intended to display arrays of information. Let's examine default invoice template v1.
It begins with Detail band, where we put such details as invoice number, term, customer data, information about issuer. This band will be printed once per each printed invoice. Open helper menu and check Page break property:
This property signals to insert page break before each invoice header, except the first one. Thus, each invoices will be printed from the first page.
Second band is InvoiceRows (detail report). If to open helper menu for this band, you will see that its data member is set to Rows to print. This table is generated dynamically: it contains all tasks or receivables from linked translation jobs. Let's repeat: invoice may be linked with multiple jobs, and each job may contain multiple rows in Tasks or Receivables tables. When Receivables table has at least one row. Rows to print table will be filled with data from Receivables table. Otherwise, it will use Job tasks table. This approach allows you to control what you want to see in invoice: all tasks (all fuzzy types), or some single row which shows average volume and price. Then you build custom invoice template, you may bind InvoiceRows band to Invoice details table instead of Rows to print table (for example, if you wish to print only totals per each job, without detailed job contents).
So, InvoiceRows detail report will be printed as many times as a number of rows in the invoice. InvoiceRows is grouped by job:
For each group, template has group footer, which displays job notes and horizontal line. Sub-band with job notes is conditionally hidden, if job does not contain notes. Second sub-band contains only horizontal row to separate jobs in template. This band is always printed (that is why it is separated from sub-band with notes).
Underlining, InvoiceRows section containsInvoiceRow band, which lists all tasks of the job linked with an invoice row.
InvoiceRows band has a report footer with total amount and notes. This footer is split to a number of sub-bands. This is done to be able to conditionally hide these sub-bands. For example, when Tax2 is not selected in an invoice, corresponding sub-band would not be printed. To achieve this, Formatting rules feature is used.
After InvoiceRows detail report, another detail report is placed - Payment methods. It will display accepted payment methods. In the header of this nested report we've put description text, which will be hidden if no any accepted payment methods were selected in a printed invoice. Again, this is achieved with the help ofFormatting rules.
Detail report linked with accepted payment methods also demonstrates interesting property: it will be printed not only in the down direction, but in the right too. This is specified via helper menu, using Multi-column mode and Column count properties. This feature allows to save some paper space and print 2 (in this example) payment methods in 1 row.


Does it all sound too complex? Maybe, a bit. Different people has absolutely different requirements to invoice templates. This leads to a increased complexity at start. Bands, especially detail reports, may force you to think that it is way to difficult to create own template. Don't think that. Instead, try to play a bit with the designer, analyze field list, understand referenced properties and tables. Invoice in the field list is a table, which requires detail report. This detail report is the whole template itself. If you need to print table property from the field list (Invoice details, Payment methods), than you must create detail report. Additional complexity is added due to two detail reports linked with Invoice details (one for rows with empty job, another for rows with selected job). This is done because BaccS allows to create invoices in two ways - with linking with jobs and without linking. When invoice row is linked with the job, we use one way of printing (displaying information from the list of task of the selected job). When job is not selected, we use another way of printing (simply displaying price, quantity and amount from the invoice row).