

Overview
Any list in TBM can be customized. Customization includes:
- Adding and removing columns
- Setting column order
- Setting column captions
- Setting default column sorting
- Setting default filter for a view
- Assigning target users for a view
- Setting custom conditional colors for rows and cells in a view
You can customize set of columns displayed in list views and assign customized lists to specific user or user groups, as well as use different lists in dashboards and full views. Such customization may serve as additional data protection level, as you may create lists views containing limited sets of columns and assign them to selected users, so they won't be able to view information from other columns, even if they have access to it according to security system configuration. However, it is not recommended to overuse such approach and instead configure security system correctly.
In TBM, we have implemented 2 approaches to customization: quick customization and full. Quick customization is performed right inside a current view, where you made changes and immediately see results. This approach allows to quickly achieve some results, but has limitations: it does not allow to set view filters and target user/roles. For latter, full customization can be used.
Below you will find instructions for both approaches.
Quick customization
If you have admin rights, you will see the following button in any opened list view:
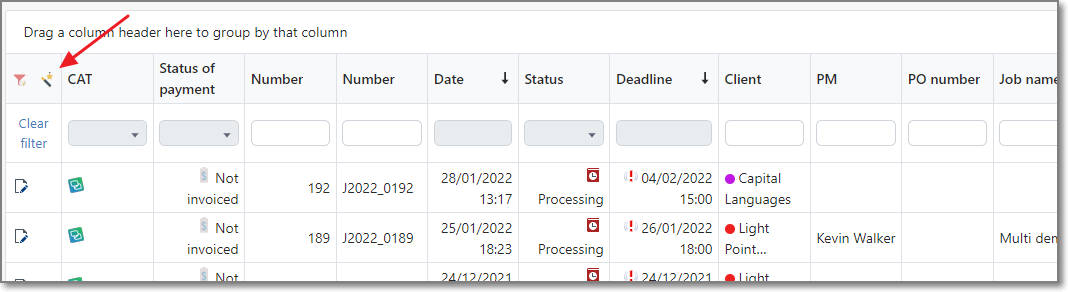
This button opens small context menu, which has two selections:
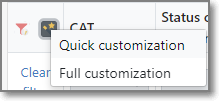
Select Quick customization to open customization panel, which is displayed above the table and has the following look:
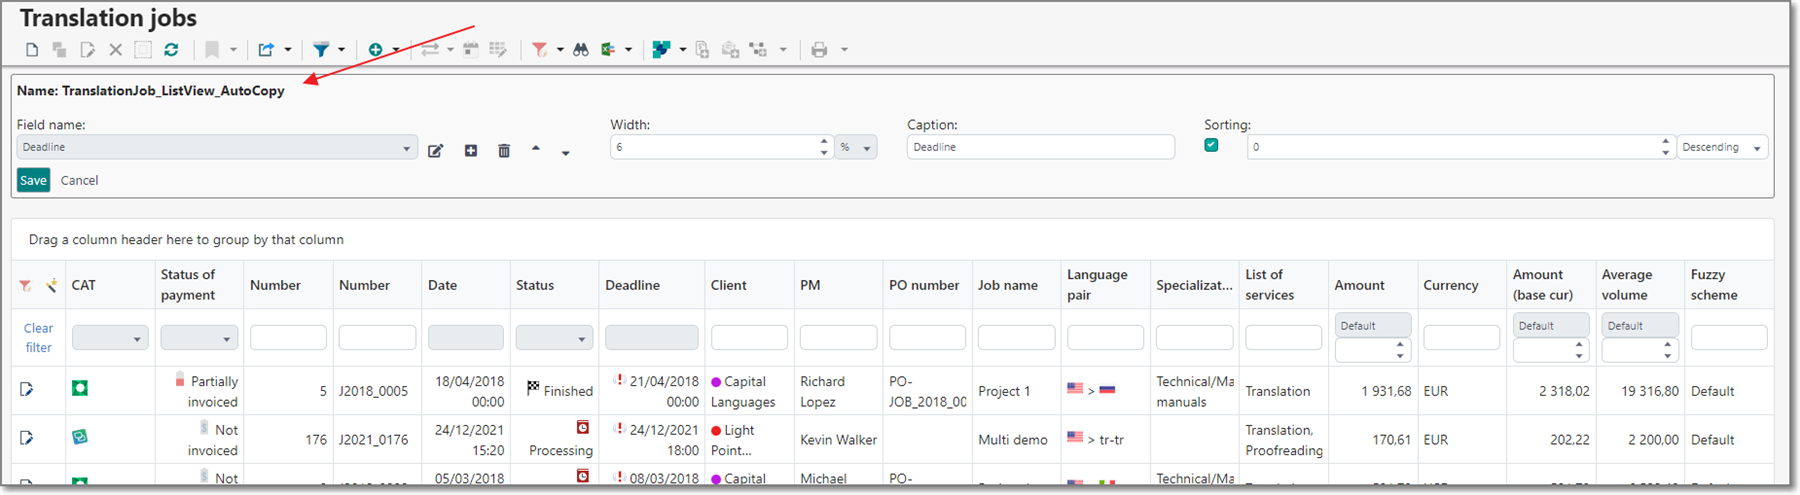
When you click Quick customization, TBM opens current view for editing. If current view is predefined one (predefined views can't be edited), then a new view will be created, with "_AutoCopy" added to a name of a view. You can change this name when using full customization dialog. Here, it can't be changed.
The first element in this panel is combo-box, which contains all columns for your current view. After you select any column there, its properties will be displayed on the right (Width, Caption, Sorting options). You can change any value, and this change will immediately be reflected in the list view below.
Additionally, near combo-box you will find the following buttons:
- Edit - opens modal dialog to edit currently selected column. You can change same settings there (width. sorting, caption), but also change backing filed to which a column is bound;
- Add - allows to add a new column to the view;
- Remove - removes a column;
- Move up/down - these buttons change column order, by moving it forward or backward in the view.
Save and Cancel buttons allow to confirm or decline changes made in the quick customization panel. Don't forget to click Save button, because after page refresh your current changes to a view will be lost.
Full customization mode
There are two ways to access full customization mode:
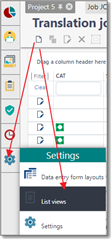
- By selecting Full customization in the context menu displayed after clicking
 button in the list. In this case, list view customization form will be opened for a current view (or for copy of a current view, if current view is predefined one).
 - By selecting List views in the Settings group of the navigation tree:
To access list views customization form, you must have administrative rights in the system.
You will get to the following page:
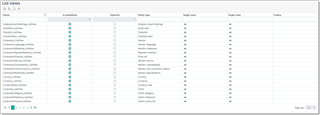
Here, you can find all list views existing in the system and control them from a single place. Here is a description of columns in this table:
- Name column displays descriptive name of a view.
- Is predefined column shows if a view is built-in or created by a user. Only custom views can be deleted or edited.
- Optional column shows if a view won't be used by default for any users, which means that this view can be used only explicitly in dashboards.
- Entity type shows type of a object which a view belongs to. Entity type specifies set of columns available for a view (table structure).
- Target users field allow to specify users for which a view will be used by default. All value means that a view should be used for all users.
- Target roles, as target users, allows to assign a view to all users who belong to specific roles. In the same manner, it is possible to select All here.
- Criteria field allows to specify filter string to limit information displayed in a table. For example, you can display only jobs/projects with delivery planned for today, or overdue invoices, or assignments for specific vendors, etc. - this is limited by your business requirements.
Creating a new list view
You can create a new view by cloning any existing (including predefined) view, or from scratch. It's always more convenient to clone existing view. To do this, just find an view for a desired entity type, select it and click clone:
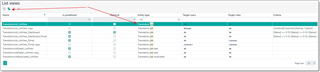
In the result, view editing form will be displayed:
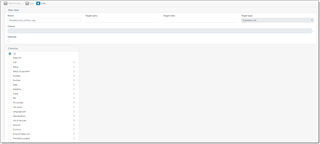
It contains a set of fields described above. Please provide some unique name and select Target users and Target roles. These fields allow to select multiple values (like tags), so you are able to select all necessary users or roles, or just select All value to make a view a default one for all users or roles. When user opens list of jobs, the application follows the following sequence:
- Searching a not predefined view (non-optional) where Target users value contains a name of a current user
- Searching a not predefined view (non-optional) where Target roles value contains a name of a current user's role
- Searching a not predefined view (non-optional) where Target roles and Target users value is All
- Searching a predefined view (non-optional) where Target users value contains a name of a current user
- Searching a predefined view (non-optional) where Target roles value contains a name of a current user's role
- Searching a predefined view (non-optional) where Target roles and Target users value is All
So, the most preferable view is custom view with a specified target user name, while the last view is a built-in view intended for all users and all roles.
Following this scheme you can create any number of views and distribute them across all users and roles existing in your system, so target users will get a view tuned for them.
To specify criteria, you can use filter builder described in the Filtering article.
After default views, you will see a tree with list of fields. You can easily drag and drop fields here, as well as remove them and add new fields. To remove unwanted fields, select them and click Delete button.
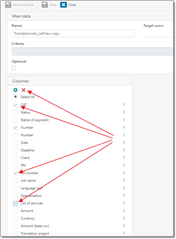
To add a new field, click Add button and fill details in the popup dialog:
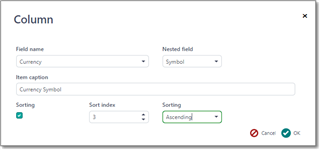
Here you can select a field. If field is of reference type, then you will see Nested field box to select which exact property of a selected field you would like to include in a column. If you wish to sort by this field by default, check Sorting box and provide sorting parameters (priority and order).
You can type any value in the Caption field, or leave it empty. Empty value means that application will automatically determine caption from the internal model. If you specify caption directly, please note that if other users who will see this view are using TBM in different language, they will still see caption provided by you, as it becomes fixed (non-localizable).
For Date fields you can check Hide time part box, to display date without time part.
Width field allows to specify default width of a column in pixels or percentages. For now, quick column width changing using mouse in list views is not supported. This functionality will be added in next versions.
Click OK to finish adding a filed and then drag it into desired place in the list.
When you are done with changes, click Save or Save and close to apply changes. If you get any error message, please fix issues and try to save again. After saving changes, you can try to open corresponding view in another tab of your browser to see how your changes where reflected in the application UI. If you're configuring a view for other users, you always can launch another browser, login there as another user and check how this user will see a view which you're configuring.
It may happen that in one of future application updates some field which you use in a custom view will be removed or even renamed. In this case, this field will disappear from your custom view. Please read version history before installing any update to find information about such changes. This is always provided in the Critical changes section.