

Overview
Dashboards serve as a single place to display differentiated information about your business on a single screen.
They allow to fit multiple widgets (views) on one screen, allowing to keep the most important data under control. In addition, there are a number of widgets which are available only in dashboards (not possible to open that views from navigation). For example, you can open list of jobs in a separate tab from navigation tree, but you cannot view Ready to invoice list anywhere except dashboard.
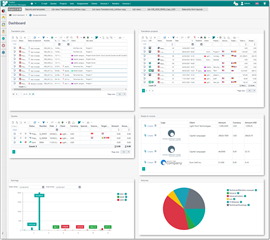
To view a default dashboard, click the first icon in the navigation menu.
A default dashboard will be opened. Since dashboard may contain a lot of widgets, it may require more time to load data for each view, comparing to individual list views, which require to load data only from one table.
You may have any number of dashboards in the system. To switch between available dashboards, use Switch dashboard button at the top toolbar. When you switch dashboard, you will immediately see selected layout, and next time you click Dashboard button in the navigation menu, previously selected dashboard will be opened by default.
Customization
To edit or create new dashboard layouts, click Manage dashboards button. The following screen will be opened:
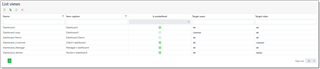
Initially, you will see only predefined layouts, which can't be modified or deleted. However, any predefined layout can be used as a base to create new views.
Name column provides some descriptive name for a layout, and this name user will see in the Switch dashboard drop-down menu.
Is predefined checkbox highlights built-in views which can not be modified or deleted.
Target users field allows to select user names for those particular view will be used by default. Non-administrative users can't customize views, so you can create layouts for them and display only data corresponding to a specified users.
Target roles has the same purpose, but allows to assign a view to a set of users who belong to specified roles.
Dashboard layout creation
To create a new layout, select any existing layout and click Clone button on the toolbar, or just click New button to start from scratch. The editing screen will look like this:
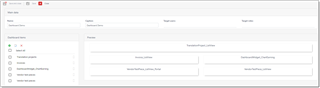
At the top, you will find Main data group, containing fields described above. The area below contains a list view with columns displayed in a table. The main area is divided into two parts: widget list and layout preview. Tree list allows to change order of widgets by dragging them and dropping them, as well as create/edit widgets. The Preview area will immediately reflect any changes you make in the list to show how final view will look like.
Dashboard widgets are placed one after another, according to a width specified for each widget. Maximum width of elements inside each row is 12. When this value is exceeded, widget will be put in a next row. Since screen sizes are usually not very large, it is recommended to select 12 (100% of width) or 6 (50% of width) as a width for your widgets. However, you're free to select any value from 1 to 12, according to your needs.
To add a new widget, click Add above the table. The following dialog appears:
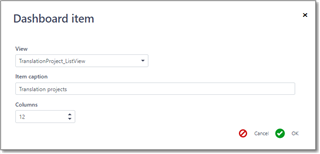
In this dialog, you can select any of existing list views, specify widget caption and its width. Click OK to save changes. Widget will be added to a list, and you will see changes in the preview area.
When you select a view, take a note that drop-down list contains not only all list views, but a number of additional views available only in dashboards:
| Widget | Short description |
| DashboardWidget_ChartEarning | Earnings chart |
| DashboardWidget_ChartTurnaround | Chart with customer amounts |
| DashboardWidget_ChartTurnaroundVendors | Chart with amounts of assignments for vendor portal |
| DashboardWidget_ChartVolumes | Volumes chart |
| DashboardWidget_ChartVolumesVendors | Volumes chart for vendor portal |
| DashboardWidget_ReadyToInvoice | Ready to invoice widget |
These widgets are provided by the application and can't be altered. With future updates, this list can grow, depending on a user suggestions which you can always submit via forums.
When you're done with configuration, click Save and close, open a dashboard and select your newly created dashboard using the Switch dashboard button. If you created a dashboard for a specific user or role, you can try to logon into the system using different browser, and open dashboard from there, to see if assigned dashboard layout works for a specified user correctly.